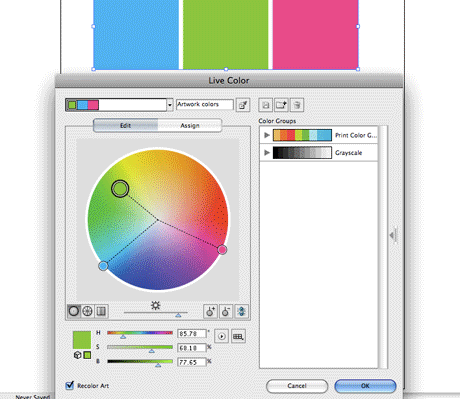
Illustrator
Don't upgrade to Adobe Illustrator CS4!
Submitted by JimD on Wed, 2008-10-01 13:12.
That's right, DON'T upgrade to Adobe Illustrator CS4 when it's released later this month. Oh, that is UNLESS you want the two most requested features in Illustrator's long and storied history.
Multiple Artboard documents and transparency in gradients have finally found their way into Adobe's latest upgrade. A whole host of other feature enhancements to smart guides, text on path, the user interface, and more, complement the two big new features in this latest upgrade.
If you're a heavy Illustrator user, this Illustrator CS4 review is definitely something you'll want to check out.
How to open a pdf in Illustrator if you don't have the fonts
Submitted by Ivan on Tue, 2008-09-30 21:41.Let's suppose you receive a pdf document that you need to further work on in Illustrator, but when you open it all fonts get replaced by the default font, because you don't have those fonts used in the pdf. The font information is there in the pdf, so theoretically if you could convert all the text to outlines you would be able to work with the document.

To do that you have to open a new Illustrator document. Place the the pdf. Select the menu Object / Flatten transparency. Make sure to check the Convert all text to outlines option and go. You got the whole pdf in curves.
Set your Illustrator tools to grey
Submitted by Ivan on Tue, 2008-09-02 18:52.
When you work with Illustrator documents your document's background is mostly white. The interface of the application, such as the panes and the toolbox are also white by default. This puts some strain on your eyes and brain when you're trying to identify each area. To relieve this extra effort you may want to experiment changing the background of the user interface to a shade of grey instead of white.
You can change this setting in Preferences/ User Interface. Don't set it too dark as it decreases the contrast between the background and graphics of the buttons making it more difficult to see the individual functions. A good balance is a color in the middle of the slider which is a light grey.
A secondary advantage of such a setting is that you will have an easy way to tell which application is running in the foreground as InDesign and Photoshop toolbars are quite similar to Illustrator.
I know there are many who prefer complete consistency of interfaces among applications. I personally prefer a small difference between them as it helps to identify instantly what I'm dealing with. That's why it was a good idea to have Safari, iTunes, Garageband and other Apple apps all have slightly different looks. It's a better parallel to the real world and it's easier for our mammalian brains to grasp.
Paste by remembering layers in Illustrator
Submitted by Ivan on Sat, 2008-08-30 10:58.
If you work with files that have a common base and several custom layers for languages or other mutations, you should always remember to switch on the Paste Remember Layers option in Illustrator. You will find this option by clicking the little contextual menu icon in the top right corner of the layers pane.
This way when you select objects across several layers in your document and copy/paste it you will retain the layer separation and naming from the source document.
Illustrator collect for output
Submitted by Ivan on Thu, 2008-05-01 10:09.
The application Art Files has been around for quite some time, but I noticed so many of my friends who use Illustrator a lot didn't know about it, so I thought it's worth sharing as it's a huge time saver.
Art Files is a stand-alone application that helps you with your work-flow. It prepares a folder that includes your Illustrator files and all other associated files, such as images and fonts to be sent to clients or colleagues. It only takes three steps to create such a complete and organized collection:
- You open Art Files and drop all the Illustrator files you want to send in the drop zone.
- Click files that are marked with a question mark and locate them. You can easily do that by using the built-in file search
- Click Collect and see how Art Files collects all the necessary images and Fonts neatly organized into folders.
Art Files is not free, but it's well worth the cost if you can replace a lot of manual work.
Phantasm CS rocks Adobe Illustrator
Submitted by JimD on Thu, 2008-04-24 12:46.When we talk about plugins, you generally assume we're talking about Photoshop add-ons. Most people don't even realize that you can add features to Adobe Illustrator using plugins, let alone name a good one. I recently found a real gem and reviewed it at The Graphic Mac, and thought it would fit in nicely here at CreativeBits as well.
Phantasm CS Studio 1.0 by Astute Graphics is not only one of those good ones, but it's a whole suite of good ones. Where most plugins have the goal of creating artwork for you, Phantasm CS is more of a production tool in that it's main set of tools involves the ability to adjust colors by Brightness/Contrast, Hue/Saturation, Curves, Levels and more. But Phantasm CS doesn't completely leave you out in the cold when it comes to cool "design" features. The Halftone tools is uber-cool if you ask me, but I'll get into that later.
All the color control tools you come to expect of a professional design package are in Phantasm CS. In the past, when you wanted to take your carefully crafted vector art from full color to a spot-color duotone, you had one choice - waste time and hard drive space bringing it into Photoshop to do the conversion, save the file, then re-import back into Illustrator. It was a tedious process at best.
I say "was" because with Phantasm CS, you can adjust the levels, curves, brightness & contrast, hue/saturation and more of your vector objects right in Illustrator as though they were bitmaps in Photoshop. And best of all, the vector objects remain editable. And if you happen to have presets already saved in Photoshop for things like duotones levels, curves, etc., you'll be happy to know that Phantasm CS can import them just as you can in Photoshop - very handy!
Phantasm CS doesn't stop with vector objects though, you can also apply the filters to text and embedded images, allowing even more time savings and creativity. And if you're looking to customize only portions of your objects, you can select to apply the filters only to the fill, stroke or both.
Now for the uber-cool part. Whereas standard color-adjustment tools such Curves and Levels don't fundamentally alter the artwork, the Halftone filters and effects reconstruct the artwork to produce some really cool results.

The Halftone filter takes your vector objects and gives you the ability to apply halftone effects such as dots, squares, lines, radials and even letters to your image in a highly customizable fashion. You not only have control over the shape/style of the halftone, but you can set it to be monochrome or full color. You can adjust the size, shape and density of the dots, as well as the angle, scale and blend of the dots. This is one of those filters that you could spend a lot of time just playing around with, and get different results every time.

When you're finished creating your masterpiece, Phantasm CS Studio provides a great color-checking toolset for anyone who prepares artwork for publishing in print. An Output Preview group of tools, comprised of Quick Separations, Overprint Preview and Ink Coverage give immediate feedback on the technical construction of the color in a CMYK document in much more detail than Illustrator does natively.
Once you preview your document and are satisfied with the results, Phantasm CS allows you to separate color plates onto different layers in your Illustrator document and include crop marks, color bars and more - with the ability to choose which color plates you wish to separate. This tool is a god-send for anyone in the screen-printing or textile industry.
Phantasm CS comes in three flavors with a tiered pricing system; Phantasm CS - $45, Phantasm CS Designer - $95, and Phantasm CS Studio - $175. Which version you buy depends on what you want included in the package. The entry-level set includes the basic color-adjustment tools. Designer includes everything in the basic set, plus the duotone, halftone, temperature/tint effect and swap channels filters. The Studio version includes all of the above, plus the output preview, separations and in-line image editing capabilities.
If your design environment is primarily Adobe Illustrator, the full Studio version is a bargain. If you mostly import your artwork into Adobe InDesign before outputting, then the Designer version is most likely adequate for your needs.
If you're uncertain about what you need, a free trial of the Studio version is available from Astute Graphics. All three versions of Phantasm CS work with Illustrator CS, CS2 and CS3 for Windows and Mac.
Overall, Phantasm CS is probably the most useful plugin set I've ever come across for any version of Adobe Illustrator. It's tools are immediately useful for any designer who works in Illustrator and the pricing is quite reasonable.
Editable Smart Objects
Submitted by Ivan on Thu, 2007-10-11 13:01.
Smart objects is extremely useful for designers putting together layouts in Photoshop. Not having to worry about resizing logos and other vector elements is a huge help.
You can not only transform and apply filters to these layers without destructing them, but also edit them in Illustrator and save them back right into Photoshop.
To edit the shapes of smart objects, find their layer that is marked with a small page icon in the lower right corner of the layer thumbnail and simply double click it. This action will open Illustrator where you can edit the untransformed version of the your vector. Once you save the file and return to Photoshop you will immediately see the modified smart object.
Transparent gradient in Illustrator
Submitted by Ivan on Mon, 2007-05-28 16:41.In Photoshop to make one layer gradually disappear to reveal another layer is common knowledge. It is achieved by applying a gradient to the top layers' mask.
Not surprisingly you can achieve the same effect with a similar approach by applying a gradient mask to objects in Illustrator too.
Here are the three simple steps to create a gradient mask in Illustrator.

Line type effect in Illustrator – or scan lines on type
Submitted by Dimitrije on Sat, 2007-04-28 00:29.
In this tutorial you will learn some important things related to object manipulating in Illustrator. You will learn how to duplicate and distribute objects in one step, how to cut unwanted paths and more.
- Dimitrije's blog
- Login or register to post comments
- Read more
Adobe CS3 videos
Submitted by Ivan on Sat, 2007-04-21 09:11.Jim from Creative Guy pointed out the great site from Adobe presenting a free Video workshop about Adobe CS3. Have fun learning!
